Build in Public
Overview
Use this skill when the project already works and the job is to make it presentable, safe, and usable in public. The default target is a sandbox repo under ~/.codex/workspaces/default/repos/ or ~/.codex/workspaces/default/labs/, but the same workflow works for any local repo.
Resources
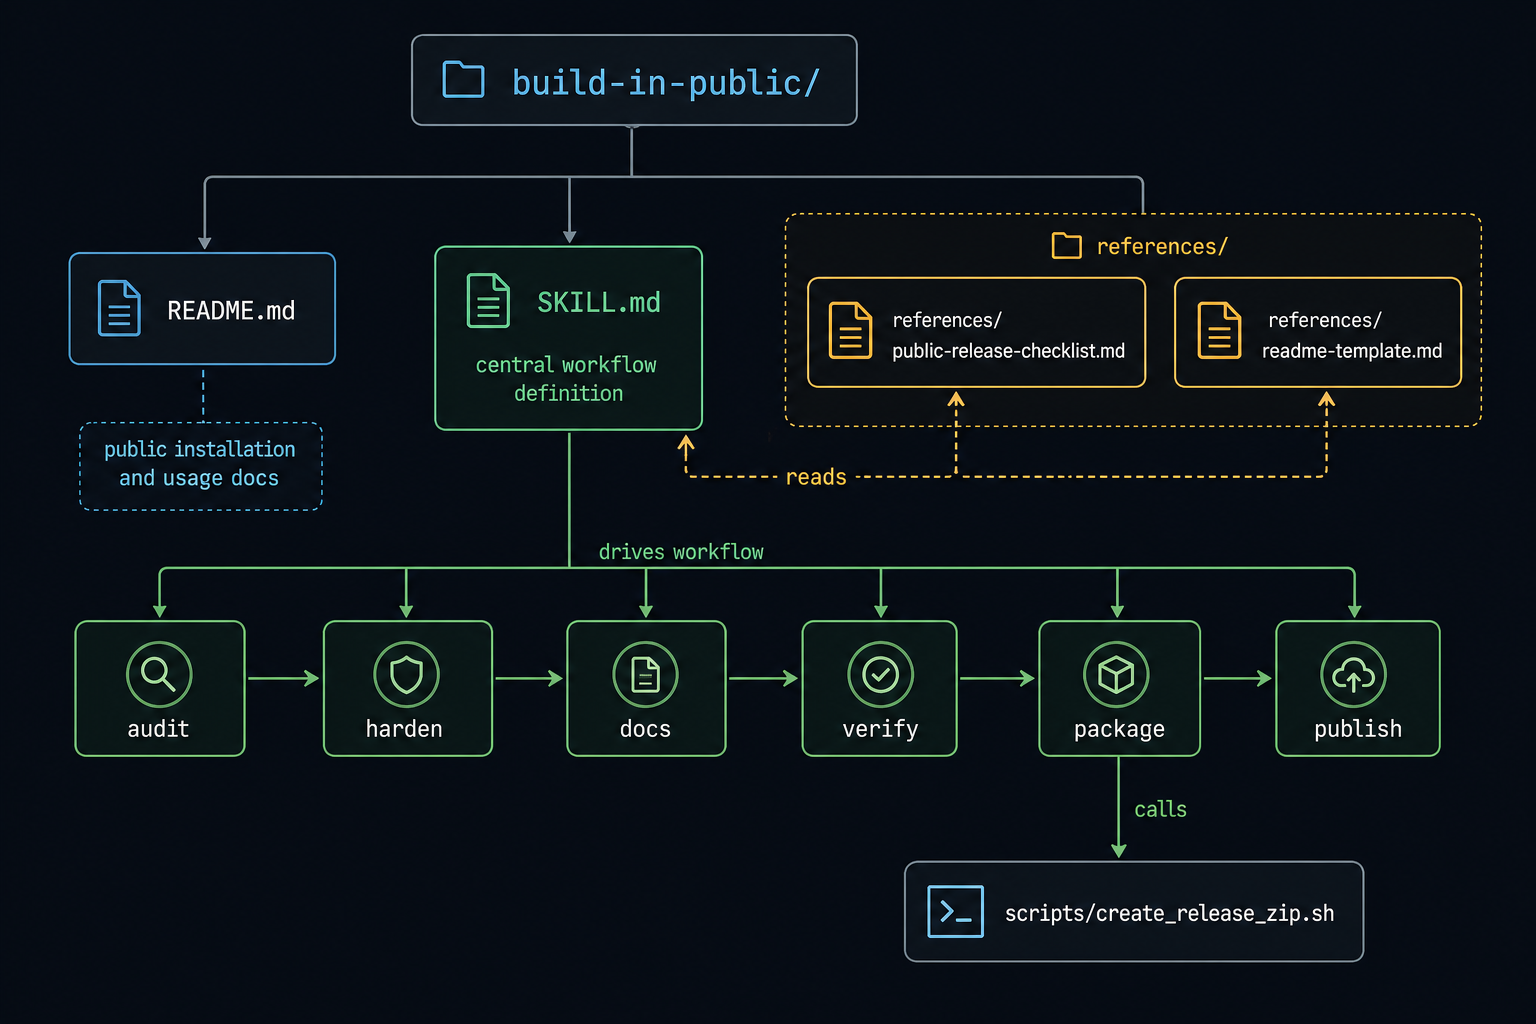
references/public-release-checklist.mdUse for the public-release gate and the final completion pass.references/readme-template.mdUse when writing or restructuringREADME.md.scripts/create_release_zip.shUse to create a clean zip from the currentHEADafter the repo is ready.
Native Codex Capabilities
When the host provides native Codex app or CLI capabilities, use them as accelerators without making them hard dependencies:
- Use web search for current publish-platform facts, package-manager behavior, security advisories, or docs that may have changed. Prefer primary sources and cite them in the final report.
- Use built-in image generation for project-bound README visuals when a repo map, architecture diagram, banner, or illustrative asset would make the project easier to understand. Generate the image, inspect it, copy the final selected file into the repo under
assets/, insert it into the README at the right narrative location, use descriptive alt text, and keep critical technical labels in Markdown, Mermaid, SVG, or nearby prose if generated text is imperfect. - Use the in-app browser for local web previews, file-backed previews, and visual review on public pages that do not require sign-in.
- Use computer use only for narrow GUI verification when the project is a desktop app, simulator flow, spreadsheet, document, presentation, or another surface that cannot be checked through normal shell/browser tooling.
- Use Codex app worktrees for isolated exploratory or parallel release-prep work, then promote only the intended files into the publish lane.
- Use native Git review, staging, commit, push, and PR support when available, but still inspect the diff and keep the working tree free of unrelated local state.
- Use automations only for recurring release health checks, scheduled maintenance reports, or follow-up monitoring; do not turn one-off publishing decisions into recurring background work.
- Use native subagents only when the user or host policy allows parallel delegation, and split independent lanes such as risk audit, docs review, and verification without overlapping file ownership.
Default Outcome
By the end of this skill, the repo should have:
- a README that clearly explains the problem, why it was built, what it does, and how to use it
- an optional project-bound diagram or visual asset when it materially improves cold-reader orientation
- a clean public-facing description and suggested GitHub topics
- basic hardening for setup, errors, ignored files, and user-facing defaults
- tests or smoke checks that prove the main path and at least one edge or failure case
- a license and example configuration where needed
- a clean zip artifact created from committed code
- either a public GitHub repo on the user's personal profile or an exact blocker explaining why publish should wait
Release Strategy
Pick the safer lane before editing:
- Reuse the existing repo when its git history, file set, and naming are already safe to expose.
- Create a clean public-export repo when the working project is good but the existing repo has scratch history, private notes, experimental debris, or secrets in history.
Rules:
- For sandbox projects, prefer a sibling public repo under
~/.codex/workspaces/default/repos/<slug>-publicwhen public history is questionable. - Preserve provenance in a short note, but do not leak private paths, internal project names, or personal machine details.
- If history rewriting would be needed to make the current repo safe, prefer a fresh public export unless the user explicitly wants history preserved.
- Do not publish anything until the repo is understandable to a stranger from a cold clone.
Workflow
1. Preflight
-
Inspect the target repo, remotes, git status, build system, test commands, and every
AGENTS.mdin scope. -
Read
references/public-release-checklist.md. -
Read
references/readme-template.mdif the README needs to be created or rewritten. -
Determine whether to harden in place or create a clean public-export repo.
-
Derive the likely public name, one-line description, install flow, and target audience from the repo itself. Ask only if those are truly ambiguous.
-
Default the publish destination to the user's personal GitHub with public visibility when the request is to build in public.
-
Check which native Codex capabilities are available in the current environment, then choose the lightest useful path: local shell for deterministic repo work, web search for current external facts, browser/computer use for UI verification, image generation for helpful visuals, and worktrees/subagents only when they improve throughput safely.
-
Ask for the spark. Before writing anything, read the code deeply enough to form three plausible hypotheses about why this was built. Then ask the user — present your three best guesses as options, plus a free-text field for something else entirely:
What was the moment that made you build this?
- [Your first hypothesis, drawn from the code]
- [Your second hypothesis]
- [Your third hypothesis]
- Something else — tell me in your own words
This pattern applies to every
AskUserQuestioncall in this skill: always propose three concrete options based on what you've already read, then leave room for the user to override. It's faster than open-ended questions, and your hypotheses often surface framing the user hadn't considered.Treat the answer as context, not gospel. The user knows their own motivation but may understate the technical interest, miss what's actually compelling about the design, or frame it too narrowly. Your job is to read the code and find what's genuinely worth talking about, then use their answer as a lens. The code is the primary source. Their answer is a hint.
2. Audit Public Risk
Inspect the repo for anything that should not go public:
- secrets,
.envfiles, tokens, API keys, private credentials, or copied shell history - internal URLs, personal emails, absolute local paths, machine-specific instructions, or private screenshots
- private datasets, vendor assets, or sample files that cannot be redistributed
- caches, logs, generated databases, debug output, and local-only artifacts
- scratch commit history that tells the wrong story or exposes private context
Guidance:
- Use fast local inspection first:
rg,git status,git log,git ls-files, and targeted file reads. - If the risk is in the working tree, clean it up.
- If the risk is only in history, prefer a clean export repo instead of risky history surgery.
3. Harden The Repo
Do the smallest credible pass that makes the project usable by other people:
- make install and run steps deterministic
- add or tighten
env.example, sample config, and ignore rules where needed - improve the primary entrypoint so errors are readable and defaults are sensible
- remove dead experimental clutter that confuses first-time users
- add or improve tests so the main path is covered plus at least one failure or edge case
- match proof to product shape:
- CLIs: command help plus a real command smoke test
- libraries: unit tests around the public API
- web apps: browser or request-level smoke on the main flow
- APIs/services: request-response proof plus error handling checks
- add lightweight CI only when the repo already has a straightforward command worth automating
- default the license to MIT unless the repo or user clearly points somewhere else
Do not turn this into a large rewrite. "Public-ready" means polished enough to be honestly shared, not rebuilt from scratch.
4. Write Public Docs
Create or rewrite the public-facing docs so a stranger can orient quickly:
- use
references/readme-template.mdfor the README structure - explain the problem first, then why this repo exists, then how to run it
- include one concrete quick-start path that works from a fresh clone
- document the test command and any required local dependencies
- be explicit about current limitations, platform assumptions, or rough edges
- include a short build-in-public note that explains the project's origin without oversharing internal context
- include a visual repo map or architecture diagram when it helps a cold reader understand the file layout, data flow, or user workflow. Prefer Mermaid or repo-native diagrams for exact labels; use native image generation for polished dark-mode illustrations, banners, or supporting visuals.
- prepare:
- a one-line GitHub description
- a short topic list
- optional release notes if the user wants an initial release
Generate the ASCII banner. Every README gets a figlet banner at the very top, above everything else. Use the rectangles font — no slanted characters. Run:
figlet -f rectangles -w 200 "<banner text>"
Banner text rules:
- Use the project's display name, not its repo slug
- Replace any hyphens with spaces (
build-in-public→build in public) - Keep everything lowercase (
Mock Pop→mock pop) - If the display name differs from the repo slug (e.g. repo
superwhisperer-lab, displaysuperwhisper lab), use the display name
Wrap the output in a fenced code block. If figlet is not installed: brew install figlet. This is the first thing someone sees — it signals that the project has a real identity.
Generate and place README visuals. When a generated image belongs in the README, treat it as a committed project artifact, not a temporary preview:
-
Decide the image's job and placement before generating it:
- repo-wide overview, architecture map, or hero visual: place it near the top of
README.md, immediately after the title and one-line summary or after the short opening paragraph if that reads better - feature screenshot or workflow image: place it in the section it explains, before the detailed prose or example it supports
- supplemental image: place it lower in the README or omit it if it does not clarify anything
- repo-wide overview, architecture map, or hero visual: place it near the top of
-
Generate the image with native Codex image generation when available, or use Mermaid/SVG/repo-native output when exact text or deterministic structure matters more.
-
Inspect the result for readability, distorted labels, private information, and whether it actually clarifies the project.
-
Copy the final selected image into the repo, usually
assets/<descriptive-name>.<ext>ordocs/assets/<descriptive-name>.<ext>. Do not leave a README-referenced asset only in a generated-images, downloads, temp, or local cache directory. -
Insert the image into
README.mdwith a relative path and meaningful alt text: -
Commit the image and README update together so the path is valid for clones, forks, GitHub rendering, and release zips.
-
If the visual will be regenerated, use a stable filename when the README should always show the latest image, or versioned filenames when preserving previous outputs matters. Keep the generation prompt, source diagram, or script in the repo when repeatability matters.
Build the narrative from the code, informed by the user. The user's spark answer is context — use it to understand intent, not to write their story for them verbatim. The real narrative comes from reading the code closely: what problem does the design actually solve, what's the non-obvious decision, what would a peer developer find interesting or worth stealing?
Your job as narrator:
- find the thing in the code that's actually interesting — the constraint that shaped the design, the approach that's different from the obvious solution, the tradeoff that was made deliberately
- frame the problem at the right level of specificity: concrete enough that someone who's had the same frustration recognizes it, general enough that it's not just about the user's exact machine
- give it a voice — not hype, not marketing copy, but the clear, slightly excited tone of a developer who actually solved something annoying and wants to tell you how
If the user's explanation is shallow ("I just needed it to work"), dig into the code and find the real story yourself. If their explanation is technically richer than the code warrants, pull it back. The README should be honest about what the project is — a small, useful, well-made tool — not oversold.
The tone is: "Here's a real problem, here's what I built, here's what's interesting about how it works." Small tools can have good stories. Don't flatten them, but don't inflate them either.
Avoid documentation sprawl. A strong README, a license, and the minimum supporting files beat a pile of ceremonial docs.
5. Verify And Package
Run the strongest verification the repo can reasonably support:
- Run the relevant install, build, lint, test, and smoke commands.
- Verify the quick-start instructions against the actual code.
- If practical, simulate a cold-clone path instead of trusting the current machine state.
- For web or visual surfaces, use the in-app browser when available and capture the verification result in the report.
- For GUI-only surfaces, use computer use narrowly and record what was checked.
- Create the public zip artifact from committed code:
bash "$(dirname "$0")/scripts/create_release_zip.sh" <repo-path>
# Or from an installed skill:
#   bash ~/.claude/skills/build-in-public/scripts/create_release_zip.sh <repo-path>   # Claude Code
#   bash ~/.codex/skills/build-in-public/scripts/create_release_zip.sh <repo-path>    # Codex
The helper writes the zip under ~/.codex/workspaces/default/artifacts/<slug>/ by default. For repos outside the codex workspace, the zip lands in /tmp/build-in-public/<slug>/.
6. Publish
If the repo should be published now:
- use the hardened repo directly when it is safe
- otherwise create a clean export repo with only the intended public files and a fresh git history
- configure the GitHub remote on the user's personal account
- create the public GitHub repo with the prepared description
- push the default branch
- add topics and release metadata when the user asked for them or when they are clearly helpful
Typical CLI path:
gh repo create <name> --public --source . --remote origin --push --description "<one-line description>"
gh repo edit <name> --add-topic <topic1> --add-topic <topic2>
git tag v1.0.0 && git push origin v1.0.0
gh release create v1.0.0 --title "v1.0.0" --notes "Initial public release."
If the user only wants the repo prepared but not yet published, stop after packaging and report what remains.
7. Report
Summarize:
- the repo path that was prepared
- whether the work stayed in place or moved to a clean public-export repo
- the public description and topics
- the tests and verification that passed
- the zip artifact path
- the GitHub URL, or the exact blocker if publishing was intentionally deferred
Guardrails
- Do not push a repo public with tracked secrets, internal docs, proprietary data, or machine-specific junk.
- Do not assume exploratory git history is safe to expose.
- Do not silently publish from a dirty mixed worktree.
- Do not ship a README that hides meaningful limitations.
- Do not add a pile of extra docs just to look mature.
- Prefer a clean public-export repo over destructive history rewriting.
- Keep the hardening pass practical. The goal is a credible first public release, not a months-long polish cycle.
Quick Triggers
Use this skill when the user says things like:
- "build this in public"
- "make this lab repo public-ready"
- "turn this prototype into a public GitHub repo"
- "package this up so other people can download and use it"
- "do the final polish so I can open-source this"